-
NSX Load Balancing Configuration – Environment explained
The following step-by-step instructions should be used to setup simple NSX Load Balancing. Firstly the environment will be explained using a network diagram. Note that this follows on a previous step-by-step guide: NSX OSPF Configuration.

Task ID
Task Description
Screenshot
Configure the three TestWin Server each with IIS services or a Webservice.
Routing etc. has already been setup using the NSX OSPF Configuration step-by-step document.
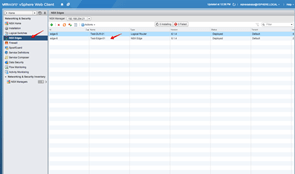
To Configure NSX Load Balancing Click on NSX Edge in the Left Menu in the Web-Client.
Then Double Click the previously configured Test-Edge-01.
Note: This procedure can also be done on a clean Edge install with small changes to the actual design.
Click Manage, Load Balancer and then Edit.
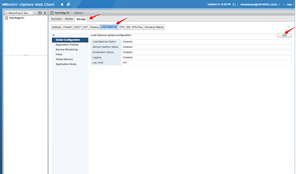
Click the Tick box next to Enable Load Balancer.
Leave tehe other option as default and Click OK.
Note:
Enable Acceleration will make the Load Balancer a Layer 4 LB, instead of the default Layer 7 LB. This greatly iproves speed.
Logging will log all action to a Syslog server
Enable Service Integration will allow the Load Balancer to Integrate with 3rd party option.

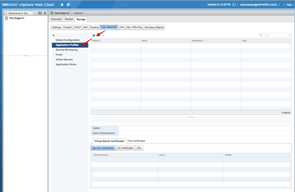
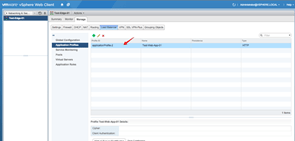
Next Click Application Profiles. Clock on the Green + sign to add an Application Profile.
Note:
Application profiles is used to group Application and specific settings usch as ports and funtion together.
In the Name field type:
Test-Web-App-01
Change the Type to:
HTTP
Leave the rest as default, Click OK.
Note:
Type – Can be TCP, HTTP, HTTPS, UDP. Lower fields change with the Type you select.
IE: HTTPS will allow for Specific Server Certificates etc.
UDP will allow for specific application ports, such as SQL on port 1433.

Saved settings shown.
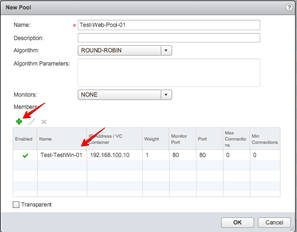
Next Click Pools. Click the Green + sign to add a new Server Pool.

In the Name Field type the Name:
Test-Web-Pool-01
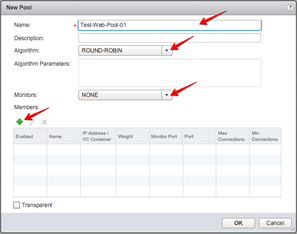
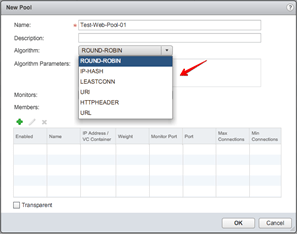
Select the required NSX Algorithm:
Algorithm : ROUND-ROBIN
Note:
Round-Robin – this will alternate amond the pool members and is typically used for general web servers.
IP-HASH – will derive an IP-Hash using the source and server IP. Usedto create sticky sessions
LEASTCONN – traffic is channeled to the server currently with the least amount of active connections.
URI – Takes a HASH of the Server and URI (Uniform Resource Identifier), and directs traffic accordingly.
HTTPHEADER –
URL –
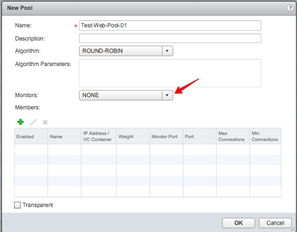
Select a monitor if required
We select none.
Click on the Green + sign to start adding Members to the pool.

Ensure the there is a tick in the Enable Member box.
Type a name in the Name field:
Test-TestWin-01
Type an IP address in the field IP Address/VC Container :
192.168.100.10
Port : 80
Monitor Port : 80
Leave the rest as default.
Click OK.

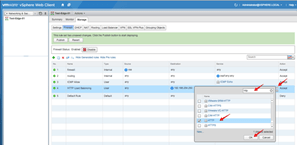
If you click on the Select button in the Field IP Address / VC Container you shall see this window.
From here you can select any vCenter Server container. Typically you may select a Resource Pool containing Web servers, or a Virtual App.

Configured details are shown.
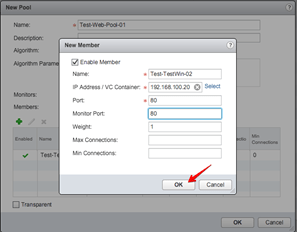
Click the Green + sign to add another Member Server.
Ensure the there is a tick in the Enable Member box.
Type a name in the Name field:
Test-TestWin-02
Type an IP address in the field IP Address/VC Container :
192.168.100.20
Port : 80
Monitor Port : 80
Leave the rest as default.
Click OK.
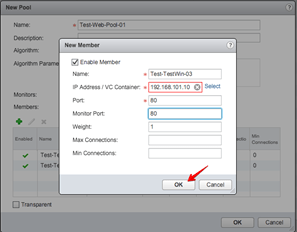
Ensure the there is a tick in the Enable Member box.
Type a name in the Name field:
Test-TestWin-03
Type an IP address in the field IP Address/VC Container :
192.168.101.10
Port : 80
Monitor Port : 80
Leave the rest as default.
Click OK.
Completed Configuration for the pool.
Click OK.

Completed Configuration for the pool.

To add the Virtual Server VIP, Select Virtual Servers from the Left Menu.
Click the Green + sign to add a Virtual Server.

Ensure there is a Tick in the Enable Virtual Server tick box.
Application Profile : Test-Web-App-01
Name : Test-Web-VIP
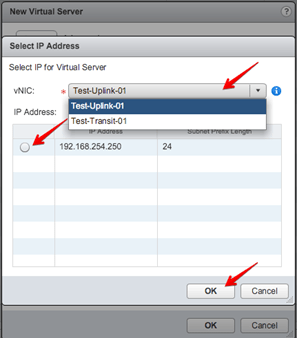
IP Address: Click the Select IP Address

In the Select IP Address window, Select:
vNIC : Test-Uplink-01
IP Address : 192.168.254.250
The vNIC and IP Address are both configured on the External facing (Internet) pre-defined dvPortGroup-Test-Ext-01.
Click OK.
Ensure the IP Address is correct:
192.168.254.250
Protocol : HTTP
Port : 80
Default Pool : Test-Web-Pool-01
Click OK.
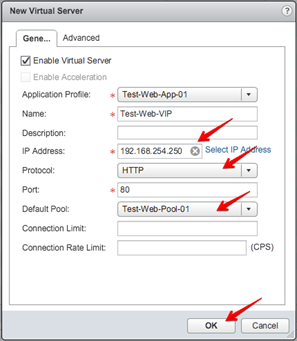
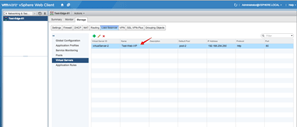
Virtual Server IP configured.
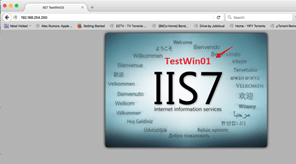
It is now time to test.
Open a browser on the External network, IE: Worskstation, and browse to:
The default Port is Port 80.

NOTHING happens? Why?
Remember when we deployed the Test-Edge-01, We selected the default Firewall rule to be Enabled, BUT Deny?
That is why. We are not allowing HTTP Traffic.

Click on Home, Then NSX Edges in the Left Menu.
Double-Click the Edge name:
Test-Edge-01

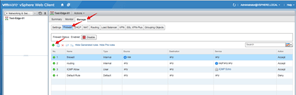
Click Manage, Firewall.
Click the Green + sign to add a new Rule
Click the + sign, Type a Name in the Fiel:
HTTP Load Balancing
Click OK.
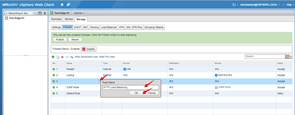
In the Destination field either click the + sign of click the red IP
to add an IP.
Clicking the + sign will give you options to add vCenter Resources, IE: VM names
Since we are using the External IP of the Edge:
192.168.254.250 : Test-Edge-01
we shall specify the IP address:
Clicking the red IP
sign will allow you to add IP addresses.


Lastly, we Specify the Service:
HTTP
Click OK.
Ensure the Rule is in Accept mode.
Click Publish Changes

Open a browser on the External network, IE: Worskstation, and browse to:
The default Port is Port 80.
By pressing F5 (Refresh) a couple of times….you can see that the Webbrowser cycles through each of the three Member Servers in the pool.